Creating a gambas2 program, step by
step, a telephone index
From: http://listingambas.blogspot.com/2011/06/modulo-importar-y-exportar-desde-el.html
One of the things that all our programs must provide, in order to be more useful is to allow reusing of data from other programs ... or ours in other programs. Can you imagine that every time you have an index with a lot of entries, you can not use it to, for example, take advantage of the address of each?
Do we have to re-write it all??
Well, in this module we will use the simplest existing way to pass data from one program to another: the clipboard.
Once having created the export module, we are going to add the code needed to transfer information from the gridviewData to clipboard
In our Fmain we create a menu: choose the name Export for it, and define the following code in Fmain :

As
we
can
see, it is divided into two subroutines:
To the first " CopyClipboard ", we pass the grid we want to copy (grid AS GridView ), then we go to read the titles of columns and the rows of different records, adding each to a variable called text.
With the command Clipboard. Copy (text), we transmit it to the clipboard.

We click on "OK" and we obtain:
To import data, we will also use the command Clipboard.Paste. For example, let us make things so that we can dump the data from a spreadsheet to our listin.
In Fmain form, we click on menu Import / Export / Import and write the following code:

We are going to create a new form: FopenOfficeCalcGambas2 with the following code to be executed every time we open it:

CheckBoxTitles, when "checked", means that the first line of the contents of the clipboard, hold the title (header data), or not (data only if not checked). We will read this property when we load. ( CheckBoxTitles.value )
The button "Click for import" executes the code that read from the clipboard
click "Add data to the directory" is responsible for passing data in gridview to memory.
"Abort" is to cancel the entire process.
Its code is so simple:
Well, let go on by parts:
Code "Click to read the clipboard" Clipboard.Paste ()
and the subroutine ReadToGrid:
Comment: the most important command is sClipboard = Clipboard.Paste ()
Code for "Append data to the directory"
From: http://listingambas.blogspot.com/2011/06/modulo-importar-y-exportar-desde-el.html
Module Import and Export from Clipboard
One of the things that all our programs must provide, in order to be more useful is to allow reusing of data from other programs ... or ours in other programs. Can you imagine that every time you have an index with a lot of entries, you can not use it to, for example, take advantage of the address of each?
Do we have to re-write it all??
Well, in this module we will use the simplest existing way to pass data from one program to another: the clipboard.
Export:
Clipboard.Copy
Once having created the export module, we are going to add the code needed to transfer information from the gridviewData to clipboard
In our Fmain we create a menu: choose the name Export for it, and define the following code in Fmain :
PUBLIC
SUBExp_Click
()
export. CopyClipboard (gridViewData)
END
export. CopyClipboard (gridViewData)
END
 Note: Note:When designing the menu with editor, we create a menu item / import export / export  |
And
in Module Export ...
PUBLIC SUBCopyClipboard
(grid
AS GridView
)
DIM
text AS
String
DIM
a
AS
Integer
DIM
b AS
Integer
IF
grid. header
=
1
OR
grid. header
=
3
THEN
FOR
a =
0
TO
grid. Columns
. COUNT
-
1
text
&
=
grid. Columns
[a]. Title
&
"\
t"
NEXT
Text
&
=
"\
n"
ENDIF
FOR
a =
0
TO
grid. Rows
. COUNT
-
1
FOR
b =
0
TO
grid. Columns
. COUNT
-
1
text
&
=
verify (grid [a, b]. text
) &
"\
t"
NEXT 'b
Text
&
=
"\
n"
NEXT
'a
Clipboard.
Copy
(text)
END
--------------------------------------------------
------------------
PUBLIC SUB verify
(sString AS
String ) AS String
DIM
a AS
Integer
DIM
letter AS
String
DIM back
AS
String
DIM
test AS
Integer
'Check for numerals
FOR
a =
1
TO
Len (string)
letter
=
Mid
$ (sString, a, a
)
test
=
InStr ( "0123456789."
, letter)
IF
test =
0
THEN
RETURN
sString
'Contains
only
letters
ENDIF
NEXT
FOR
a =
1
TO
Len (
sString)
letter
=
Mid $ (
sString, a, a
)
IF
letter =
"."
THEN
letter
=
""
ENDIF
back
&
=
letter
NEXT
RETURN
back
END
To the first " CopyClipboard ", we pass the grid we want to copy (grid AS GridView ), then we go to read the titles of columns and the rows of different records, adding each to a variable called text.
With the command Clipboard. Copy (text), we transmit it to the clipboard.
The second subroutines "verify " convert "decimal point" so that a spreadsheet, for example, may correctly reads the figures where localization need comma as a decimal separator .
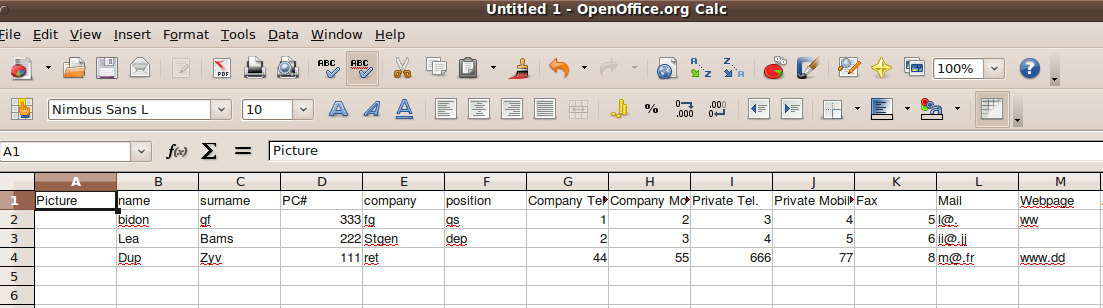
After clicking on the menu "Export", current gridviewData content (or, if filtered, only the result through the filter) is copied to the clipboard, allowing to paste it (into eg OpenOffice Calc):We
open
OpenOffice
Calc, we click on the menu "Edit / Paste"
and we will get this screen:
We click on "OK" and we obtain:
Import:
Clipboard.Paste
To import data, we will also use the command Clipboard.Paste. For example, let us make things so that we can dump the data from a spreadsheet to our listin.
In Fmain form, we click on menu Import / Export / Import and write the following code:
PUBLIC
SUB
Imp_Click ()
FOpenOfficeCalcGambas2.
Show
()
END
We are going to create a new form: FopenOfficeCalcGambas2 with the following code to be executed every time we open it:
PUBLIC SUB
Form_Open ()
ReadGridView.
Rows
. COUNT
=
1001
ReadGridView.
Columns
. COUNT
=
20
END
END
CheckBoxTitles, when "checked", means that the first line of the contents of the clipboard, hold the title (header data), or not (data only if not checked). We will read this property when we load. ( CheckBoxTitles.value )
The button "Click for import" executes the code that read from the clipboard
click "Add data to the directory" is responsible for passing data in gridview to memory.
"Abort" is to cancel the entire process.
Its code is so simple:
PUBLIC
SUB
ButtonAbort_Click ()
ME.Close
()
END
Well, let go on by parts:
Code "Click to read the clipboard" Clipboard.Paste ()
PUBLIC
SUB
ReadNotePad_Click ()
DIM
titles AS
Boolean
IF
CheckBoxTitles. value
=
-
1
THEN
FOpenOfficeCalcGambas2. ReadGridView
. Header
=
1
title =
- 1
ELSE
FOpenOfficeCalcGambas2.
ReadGridView
. Header
=
0
titles =
0
ENDIF
ReadGridView.
Row
. COUNT
=
0
ReadGridView.
Columns
. COUNT
=
0
ReadGridView.
Row
s
. COUNT
=
1001
ReadGridView.
Columns
. COUNT
=
20
ReadToGrid
(FOpenOfficeCalcGambas2. ReadGridView
, titles)
END
and the subroutine ReadToGrid:
PUBLIC
SUB
ReadToGrid (grid AS
gridview, title AS
Boolean
)
'Grid:
the gridview where to put the data
'Titles:
0: no title, -1: the1st row contains titles
DIM sLline AS
String []
DIM current_line
AS
String
DIM
columns AS
String []
DIM
a AS
Integer
DIM
c AS
Integer
DIM
string AS
String
DIM s
clipboard AS
String
DIM endlines
AS
String
DIM endcolumns
AS
String
endlines =
"\
n"
"carriage
return
(between rows)
endcolumns
=
"\
t"
'tab
(between
the number of columns)
sClipboard
=
Clipboard. Paste ()
sLine =
Split
(clipboard, endlines )
FOR
a =
0
TO sLine. COUNT
-
1
current_line =
lines [a]
columns =
Split
(current_line,
endcolumns )
FOR
c =
0
TO
columns. COUNT
-
1
IF
a =
0
AND
title =
-
a
THEN
grid.
Columns
[c]. title
=
columns [c]
ELSE
IF
titles =
0
THEN
grid [a, c]. text
=
columns [c]
IF
title =
-
1
THEN
grid [a -
1
, c]. text
=
columns [c]
ENDIF
NEXT
'c
NEXT
'a
END
Comment: the most important command is sClipboard = Clipboard.Paste ()
Command
Split
()
will separate lines of text with carriage return "\ n" while data are
separated by tab
"\ t"
Code for "Append data to the directory"
PUBLIC SUB
ButtonAdd_Click ()
DIM
a AS
Integer
DIM repeat AS
Integer
IF
CheckBoxtitles. Value
=
TRUE
THEN
'The
first line holds titles
a
=
1
ENDIF
FOR
repeat =
to TO
1001
IF verifisvoid
(repeat) <> 1
THEN
var.
id
. add
( "Id"
&
Str
$ ( Now
) &
Str
$ (repeat))
var.
dni
. add
(ReadGridView [repeat, 3
]. text
)
var.
name
. add
(ReadGridView [repeat 1
]. text
)
var.
surname
. add
(ReadGridView [repeat, 2
]. text
)
var.
company
. add
(ReadGridView [repeat, 4
]. text
)
var. position
. add
(ReadGridView [repeat 5
]. text
)
var.
telf_company
. add
(ReadGridView [repeat, 6
]. text
)
var.
telf_private
. add
(ReadGridView [repeat, 8
]. text
)
var.
fax
. add
(ReadGridView [repeat, 10
]. text
)
var. mobile_company
. add
(ReadGridView [repeat, 7
]. text
)
var. mobile_private
. add
(ReadGridView [repeat, 9
]. text
)
var.
page.
add
(ReadGridView [repeat, 12
]. text
)
' Do not nead
image
data, just adds the Gambas icon
var.
photo
. add
( "icon:
/
16/gambas"
)
var. adress
. add
(ReadGridView [repeat, 13
]. text
)
var. comments
. add
(ReadGridView [repeat, 14
]. text
)
var. data_date
. add
(ReadGridView [repeat, 15
]. text
)
var. mail
. Add
(ReadGridView [repeat, 11
]. text
)
ELSE
GOTO
EndRead
ENDIF
NEXT
EndRead:
title.
fill
()
Message.
info
( "data loaded"
)
ME
.Close
END
'----------
If
the
row contains no more data (all fields are ""), then return 0
----------------------
PUBLIC
FUNCTION
verifisvoid
(row
AS
Integer ) AS Integer
DIM
b AS
Integer
FOR
b =
0
TO
19
'columns
as
often
as any, for not entering blank records
IF
ReadGridView
[row,
b]. text
<> ""
THEN
RETURN
0
ENDIF
NEXT
RETURN
1
END
Comment:
1.
The
function verifisvoid,
returns
0
when line
of
ReadGridView are
completely
empty (no
text
in
any of its
columns) , and the main proceedings Buttonadd_Click
()
, stop getting
information, otherwise it returns 1 and continues
adding
records
.
(
IF
verifisvoid (repeat) <> 1 THEN
....)
2.
Image
is
the only data not no be read, we just adds the symbol of Gambas
var.foto.add ("icon: / 16/gambas")
as
it
should be a path, if it were not a valid path, it would cause an
error that would exit of the program.
... I leave it as homework if you want to improve this part of the code ....
... I leave it as homework if you want to improve this part of the code ....
